Using the Windows Binary Distribution
This page provides important information for users of the Ice binary distribution on Windows platforms.
On this page:
Overview of the Windows binary distribution
The Ice binary distribution for Windows provides the Ice run-time and SDKs for the following programming languages and platforms:
- for C++, using Visual Studio 2010, 2012, 2013 or 2015
- for .NET, using Visual Studio 2012, 2013 or 2015
- for Java, using Java 7 or Java 8
- for Android, using Android 4.2 or later
- for PHP, using PHP 5.6
You only need the development environment for your target programming language to use this distribution. For example, if you want to build Ice applications in Java, you need to install a JDK, but do not need to install Visual Studio or PHP.
Ice Builders
You should also install the Ice Builder for your development environment, such as the Ice Builder for Visual Studio or the Ice Builder for Gradle. These Ice Builders are not included in the Windows binary distribution, and typically support several versions of Ice.
When upgrading to a new version of Ice, please remember to update the Ice Home configuration of the Ice Builder for Visual Studio.
C++ run-time
The Ice binary distribution for Windows installs the Visual Studio 2013 32-bit C++ run-time on your computer. It does not install any other C++ run-time.
This allows you to execute all C++ programs installed in the main bin directory (such as icegridregistry.exe and slice2java.exe) without having to install Visual Studio 2013 or the Visual Studio 2013 C++ x64 redistributable package. However, if you want to execute C++ programs installed in the bin subdirectories, such as bin\x64\icegridregistry.exe or bin\vc110\icegridregistry.exe, you need to install the corresponding Visual Studio C++ redistributable package.
Setting up your Windows environment to use Ice
After installing Ice, read the relevant language-specific sections below to learn how to configure your environment and start programming with Ice.
Please note that the instructions below assume that Ice was installed in the default location C:\Program Files (x86)\ZeroC\Ice-3.6.5.
C++
To use Ice for C++ you need to add one or more of the Ice bin directories to your PATH. The changes you must make depend on your compiler and architecture, as listed below. If you don't want to rely on the PATH environment variable to locate the Ice for C++ DLLs, you can also copy the DLLs into the same directory as your executable.
PATH Environment Variable
Assuming you set ICE_HOME to your Ice home installation directory, by default C:\Program Files (x86)\ZeroC\Ice-3.6.5:
set ICE_HOME=C:\Program Files (x86)\ZeroC\Ice-3.6.5
Add the following directory or directories to your PATH:
| Visual Studio Version | Alias | PATH for 32-bit Applications | PATH for 64-bit Applications |
|---|---|---|---|
| Visual Studio 2015 | vc140 | set PATH=%ICE_HOME%\bin\vc140;%PATH% | set PATH=%ICE_HOME%\bin\vc140\x64;%ICE_HOME%\bin\vc140;%PATH% |
| Visual Studio 2013 | vc120 (default for Ice 3.6) | set PATH=%ICE_HOME%\bin;%PATH% | set PATH=%ICE_HOME%\bin\x64;%ICE_HOME%\bin;%PATH% |
| Visual Studio 2012 | vc110 | set PATH=%ICE_HOME%\bin\vc110;%PATH% | set PATH=%ICE_HOME%\bin\vc110\x64;%ICE_HOME%\bin\vc110;%PATH% |
| Visual Studio 2010 | vc100 | set PATH=%ICE_HOME%\bin\vc100;%PATH% | set PATH=%ICE_HOME%\bin\vc100\x64;%ICE_HOME%\bin\vc100;%PATH% |
Compiler Flags
The Release versions of the Ice libraries are compiled with /MD to select the multi-threaded Visual C++ run-time library, while the Debug versions use /MDd to select the debug multi-threaded run-time library. Both versions of the Ice libraries are compiled with /EHsc to select an exception handling model.
Your application must be compiled with the same flags as the Ice libraries:
- Release:
/MD /EHsc - Debug:
/MDd /EHsc
Import Libraries
You no longer need to list Ice import libraries such as IceD.lib when linking with Ice libraries. See Linking with C++ Libraries on Windows for additional details.
ZeroC Symbol Server
The ZeroC symbol server, https://symbols.zeroc.com, provides debug symbols for all C++ binaries included in the Ice binary distribution for Windows.
To use this symbol server, add its URL on Visual Studio's Symbols page:
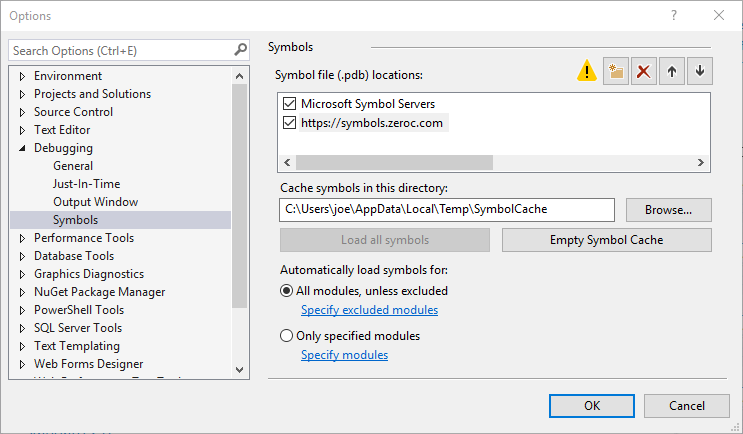
Check "Enable source server support" in Visual Studio's debugging options to allow Visual Studio to fetch the corresponding source code.
Debug Symbols and Stack Traces for C++ Applications
Ice C++ applications can print stack traces for Ice exceptions, which can be very helpful for debugging. In order to get usable stack traces, you need to install the corresponding Ice debug symbols in a local folder, and configure your system to look for debug symbols in this folder. We recommend you do the following:
- Download and install the Debugging Tools for Windows.
Add these tools to your PATH, for example:
set PATH=C:\Program Files (x86)\Windows Kits\10\Debuggers\x64;%PATH%
Download the debug symbols of your Ice NuGet package(s) to your local
SymbolCachefolder, with thesymchktool included in the Debugging Tools for Windows. For example:symchk /v /r C:\Program Files (x86)\ZeroC\Ice-3.6.5\bin\* /s SRV*%TEMP%\SymbolCache*https://symbols.zeroc.com
(remove the
/voption for a quieter output)
This copies debug symbols for all the binaries in the selected folder and subfolders to%TEMP%\SymbolCache.%TEMP%\SymbolCacheis also the default symbol cache folder for Visual Studio.Set the environment variable _NT_SYMBOL_PATH to point to this local
SymbolCachefolder, for example:set _NT_SYMBOL_PATH=%TEMP%\SymbolCache
.NET
Locating the .NET assemblies
To use Ice for .NET, you can either copy the .NET assemblies to the directory of your executable or add the .NET assemblies to the Global Assembly Cache (GAC).
Copying the Ice for .NET assemblies to the executable directory is the simplest solution. You can set up your Visual Studio projects to copy the assemblies by setting the Copy Local property to True. To access this property in the Solution Explorer, open the References folder of your project and click on the assembly to access its properties in the Properties panel.
You can also add the Ice for .NET assemblies to the GAC. To do this, open a command prompt window with Administrator privileges and use gacutil:
gacutil /i <library.dll>
The gacutil tool is included with your Visual Studio installation. You can find which gacutil you are using with the where command, for example:
where gacutil
C:\Program Files (x86)\Microsoft SDKs\Windows\v8.1A\bin\NETFX 4.5.1 Tools\x64\gacutil.exe
Once installed in the GAC, the assemblies will always be located correctly without having to set environment variables or copy them into the same directory as an executable.
Line numbers for stack traces
If you've installed the Ice assemblies in the GAC and want line numbers for stack traces, you must also install the PDB (.pdb) files in the GAC. Unfortunately, you cannot do this using Explorer, so you have to do it from the command line. Open a command shell window and navigate to C:\Windows\Microsoft.NET\assembly\GAC_MSIL\Ice (assuming C:\Windows is your system root). Doing a directory listing there, you will find a directory named v4.0_3.6.5.0__<UUID>, for example:
v4.0_3.6.5.0__cdd571ade22f2f16
Change to that directory (making sure that you use the correct version number for this release of Ice). In this directory, you will see the Ice.dll you installed into the GAC in the preceding step. Now copy the Ice.pdb file into this directory:
copy C:\Program Files (x86)\ZeroC\Ice-3.6.5\Assemblies\Ice.pdb
Using protocol compression
The Ice for .NET run time implements protocol compression by dynamically loading the native library bzip2.dll from a directory in your PATH. Ice disables the protocol compression feature if it is unable to load the bzip2 library successfully.
This DLL is included in your Ice distribution, therefore the Ice bin directory must be added to your PATH:
set PATH=C:\Program Files (x86)\ZeroC\Ice-3.6.5\bin;%PATH%
On 64-bit Windows, use the following setting instead:
set PATH=C:\Program Files (x86)\ZeroC\Ice-3.6.5\bin\x64;%PATH%
If the wrong PATH is set, the Ice run time prints a warning to the console when it detects a bzip2.dll format mismatch during start-up.
Using managed code in .NET
The main Ice for .NET assembly (Ice.dll) included in the Windows binary distribution uses unmanaged code. If you require only managed code then you can clone the ice repository and build Ice for .NET in a purely managed version. Note that the managed version of Ice for .NET omits support for protocol compression and for signal handling in the Ice.Application class.
PHP
The Ice extension for PHP included in this installer is compiled with VC11 for compatibility with the PHP binary distribution. To use this extension, you will need a compatible PHP binary distribution as well as a compatible Web server. If you wish to use Apache, you can obtain a VC11 build of Apache from alternate sources as Apache does not provide a VC11 build (PHP recommends the builds by Apache Lounge).
If you require a version of the Ice extension for a different environment, you will need to compile the extension from source. Clone the ice repository and review the php/INSTALL file for details.
We provide instructions below for configuring PHP to use the Ice extension. Please defer to your web server's instructions to configure it to run PHP. These instructions make several assumptions:
- PHP is installed in
C:\PHP C:\PHPis in your system path- Ice is installed in
C:\Program Files (x86)\ZeroC\Ice-3.6.5
If you have a different installation, you will need to make the appropriate changes as you follow the instructions.
1. Determine the location of your PHP configuration file
Check for the location of your php.ini file by examining the output of the php -i command, or by calling the phpinfo() function from a script, for the line Loaded Configuration File. For example:
C:\PHP\php.ini
If no file has been loaded then you will need to create one. PHP provides templates for development and production use:
C:\PHP\php.ini-developmentC:\PHP\php.ini-production
Depending on your environment, copy the correct file to a new file, C:\PHP\php.ini, and configure it as needed. Verify that it is loaded as described above.
As an administrator, open the php.ini in a text editor and append the following line:
extension = php_ice.dll
The file php_ice.dll contains the Ice extension for PHP.
2. Install the Ice extension DLL
Look for the extension_dir setting in the output of the command php -i:
extension_dir = "C:\PHP\ext"
If instead the extension_dir setting contains a relative path, it is resolved relative to the working directory of the web server process (For example, Apache's working directory is usually its installation directory.)
Copy the DLL for the Ice extension to PHP's extension directory:
copy "C:\Program Files (x86)\ZeroC\Ice-3.6.5\php\php_ice.dll" "C:\PHP\ext"
3. Verify that the dependent libraries can be loaded
Regardless of the location of PHP's extension directory, the Ice extension's dependent libraries must be located in the executable search path of the calling process, either your web server or directly from the command line.
The Ice extension depends on the following libraries:
bzip2.dllice36.dlliceutil36.dllslice36.dll
All of these files can be found in the bin subdirectory of your Ice installation (e.g., C:\Program Files (x86)\ZeroC\Ice-3.6.5\bin\vc110). To add the Ice installation directory to the system PATH, open the System control panel and change the system PATH to include C:\Program Files (x86)\ZeroC\Ice-3.6.5\bin\vc110. Note that Windows must be restarted for this change to take effect.
If you're using Apache and it cannot find or access a DLL, Apache startup may fail with an access violation, or the PHP module may ignore the Ice extension and continue its initialization. Consequently, a successful Apache startup does not necessarily mean that the Ice extension has been loaded. Unfortunately, the message reported by PHP in Apache's error log is not very helpful; the error might imply that it cannot find php_ice.dll when in fact it was able to open php_ice.dll but a dependent DLL was missing or inaccessible.
4. Review access rights
Review the access rights on PHP's extension directory, the Ice extension DLL, and its dependent libraries. For example when running as a Windows service, Apache runs in the Local System account (also known as NT Authority\SYSTEM). You can use the icacls utility in a command window to view and modify access rights. For example, run the following commands to review the current access rights of the Ice extension:
cd \PHP\ext
icacls php_ice.dll
5. Locate the Ice run-time files
Your application will also need to include at least some of the Ice for PHP run-time source files (installed in C:\Program Files (x86)\ZeroC\Ice-3.6.5\). To make these files available to your application, you can either modify PHP's include path or copy the necessary files to a directory that is already in the interpreter's include path. You can determine the current include path by running the command phpphp -i and searching for an entry named include_path.
If you want to make the Ice run-time files available to all PHP applications on the host, you can modify the include_path setting in php.ini to add the installation directory:
include_path = C:\Program Files (x86)\ZeroC\Ice-3.6.5;...
Another option is to modify the include path from within your script prior to including any Ice run-time file:
ini_set('include_path', ini_get('include_path') . PATH_SEPARATOR . 'C:/Program Files (x86)/ZeroC/Ice-3.6.5/php')
require 'Ice.php'; // Load the core Ice run time definitions.
Using the sample programs on Windows
The Ice sample programs are provided in a GitHub repository. You can browse this repository to see build and usage instructions for all supported programming languages.
During installation, you can choose to install the sample programs for all supported programming languages in a folder of your choice (by default a sub-folder of your Documents folder). You'll then find a shortcut to this folder in your Start menu.
Alternatively, you can clone the ice-demos repository and use its 3.6 branch:
git clone -b 3.6 https://github.com/zeroc-ice/ice-demos.git
cd ice-demos
Configuration files for IceGrid and Glacier2 services
The config subdirectory of your Ice installation includes sample configuration files for the Glacier2 router, IceGrid node, and IceGrid registry. These files provide a good starting point on which to base your own configurations, and they contain comments that describe the settings in detail.
The Ice manual provides more information on installing and running the IceGrid registry, IceGrid node, and Glacier2 router as Windows services.
Starting IceGrid Admin on Windows
You can launch IceGrid Admin using the shortcut that the Ice installer created in your Start menu as IceGrid Admin. IceGrid Admin is a Java program and requires JRE 7u6 or later.
Unattended installation
The Ice installer supports unattended installation. For example, in an administrative command window you can run:
start /wait Ice-3.6.5.msi /qn /l*v install.log
Windows may prompt you to confirm the installation, otherwise the installer runs using its default configuration (i.e., default installation directory with no optional components) but without any user interface. The installer will create a log of its activities in the file install.log.
Use the /qb option instead to install the default configuration while showing a progress dialog:
start /wait Ice-3.6.5.msi /qb /l*v install.log
Ice installer registry key
The Ice installer adds information to the Windows registry to indicate where it was installed. Developers can use this information to locate the Ice files in their applications.
The registration key used by this installer is:
HKEY_LOCAL_MACHINE\Software\ZeroC\Ice 3.6.5
The install location is stored as a string value named InstallDir.
Third-party packages for Windows
The binary distribution for Windows includes the following third-party packages as separate binaries:
- Berkeley DB 5.3.28 (C/C++ and Java run-time)
- Bzip2 1.0.6 (C run-time)
- Expat 2.1.0 (C run-time)