Configuring IceSSL for Schannel
After installing IceSSL, an application typically needs to define a handful of additional properties to configure settings such as the location of certificate and key files. This page provides an introduction to configuring the plug-in for Windows applications using the Microsoft Secure Channel (Schannel) version of the plug-in.
On this page:
Configuring IceSSL for C++ and .NET on Windows
IceSSL for .NET and C++ supports loading certificates, keys, and trusted CA certificates from regular files. You can also make use of Windows certificate stores.
Using Certificate Files
Our first example demonstrates how to configure IceSSL with certificate files:
# For .NET:
Ice.Plugin.IceSSL=IceSSL.dll:IceSSL.PluginFactory
# For C++:
Ice.Plugin.IceSSL=IceSSL:createIceSSL

IceSSL.DefaultDir=C:\certs
IceSSL.CAs=cacert.pem
IceSSL.CertFile=cert.pfx
IceSSL.Password=password
Notice that the value for Ice.Plugin.IceSSL differs depending on the language mapping you're using. The Ice.Plugin properties also support an alternate syntax that allows you to define both variations in the same configuration file if desired.
The IceSSL.DefaultDir property is a convenient way to specify the default location of your certificate files. The two subsequent properties identify the files containing the trusted CA certificate and the certificate with private key, respectively. When these properties specify a relative path name, as shown here, IceSSL attempts to find these files in the directory defined by IceSSL.DefaultDir. The file specified in IceSSL.CAs should normally be in the Privacy Enhanced Mail (PEM) format, whereas the file in IceSSL.CertFile must use the Personal Information Exchange (PFX, also known as PKCS#12) format and contain both a certificate and its corresponding private key. The IceSSL.Password property specifies the password used to secure the file.
It is a security risk to define a password in a plain text file, such as an Ice configuration file, because anyone who can gain read access to your configuration file can obtain your password. IceSSL also supports alternate ways to supply a password.
Using Certificate Stores
Windows uses certificate stores as the persistent repositories of certificates and keys. Furthermore, there are two distinct sets of certificate stores, one for the current user and another for the local machine.
Managing Certificates with the Microsoft Management Console
On Windows, you can use the Microsoft Management Console (MMC) to browse the contents of the various certificate stores. To start the console, run MMC.EXE from a command window, or choose Run from the Start menu and enter MMC.EXE.
Once the console is running, you need to install the Certificates "snap-in" by choosing Add/Remove Snap-in from the File menu. Click the Add button, choose Certificates in the popup window and click Add. If you wish to manage certificates for the current user, select My Current Account and click Finish. To manage certificates for the local computer, select Computer Account and click Next, then select Local Computer and click Finish.
When you have finished adding snap-ins, close the Add Standalone Snap-in window and click OK on the Add/Remove Snap-in window. Your Console Root window now contains a tree structure that you can expand to view the available certificate stores. If you have a certificate in a file that you want to add to a store, click on the desired store, then open the Action menu and select All Tasks/Import.
Configuring IceSSL using Certificate Stores
If the program's certificate and private key are already installed in a certificate store, you can select it using the IceSSL.FindCert configuration property as shown in the following example:
Ice.Plugin.IceSSL=...
IceSSL.FindCert=subject:"Quote Server"
IceSSL.CertStore=My
IceSSL.CertStoreLocation=LocalMachine
An IceSSL.FindCert property executes a query in a particular certificate store and selects all of the certificates that match the given criteria. In the example above, the location of the certificate store is LocalMachine (as defined by IceSSL.CertStoreLocation) and the store's name is My (as defined by IceSSL.CertStore). When using MMC to browse the certificate stores, this is equivalent to the store "Personal" in the location "Certificates (Local Computer)."
The other legal value for IceSSL.CertStoreLocation is CurrentUser. The following table shows the valid values for IceSSL.CertStore and their equivalents in MMC:
Property Value | MMC Name |
|---|---|
| Other People |
| Third-Party Root Certification Authorities |
| Intermediate Certification Authorities |
| Untrusted Certificates |
| Personal |
| Trusted Root Certification Authorities |
| Trusted People |
| Trusted Publishers |
The search criteria consists of name:value pairs that perform case-insensitive comparisons against the fields of each certificate in the specified store, and the special property value * selects every certificate in the store. Typically, however, the criteria should select a single certificate. In a server, IceSSL must supply Windows with the certificate that represents the server's identity; if a configuration matches several certificates, IceSSL chooses one (in an undefined manner) and logs a warning to notify you of the situation.
Selecting a certificate from a store is more secure than using a certificate file via the IceSSL.CertFile property because it is not necessary to specify a plain-text password. MMC prompts you for the password when initially importing a certificate into a store, so the password is not required when an application uses that certificate to identify itself.
Trusted CA Certificates
We made no mention of trusted CA certificates in the configuration above. For a program to be able to successfully authenticate a certificate it receives from a peer, all trusted CA certificates must either be loaded via the IceSSL.CAs property or already be present in the appropriate certificate stores.
When installing a trusted CA certificate, authentication succeeds only when the certificate is installed into one of the following stores:
- Local Computer / Trusted Root Certification Authorities
- Local Computer / Third-Party Root Certification Authorities
- Current User / Trusted Root Certification Authorities
Note that administrative privileges are required when installing a certificate into a Local Computer store.
Configuring IceSSL for UWP on Windows
IceSSL for UWP supports loading certificates and keys from regular files. You can also use certificates and keys from certificate stores. Trusted CA certificates must be configured using the Trusted Root Certification Authorities.
The ability to use client-side certificates in UWP is a new feature added in Ice 3.7.
Using Certificate Files
Our first example demonstrates how to configure IceSSL with certificate files:
Ice::registerIceSSL();
Ice::InitializationData initData;
initData->properties = Ice::createProperties();

properties->setProperty("IceSSL.CertFile", "ms-appx:///cert.pfx");
properties->setProperty("IceSSL.Password", "password");
The file in IceSSL.CertFile must use the Personal Information Exchange (PFX, also known as PKCS#12) format and contain both a certificate and its corresponding private key. The file must use "ms-appx://" or "ms-appdata://" URIs. The IceSSL.Password property specifies the password used to secure the file.
It is a security risk to define a password in a plain text file, such as an Ice configuration file, because anyone who can gain read access to your configuration file can obtain your password. IceSSL also supports alternate ways to supply a password.
Using Certificate Stores
Configuring IceSSL using Certificate Stores
If the program's certificate and private key are already installed in a certificate store, you can select it using the IceSSL.FindCert configuration property as shown in the following example:
IceSSL.FindCert=FRIENDLYNAME:"Client"
IceSSL.CertStore=My
An IceSSL.FindCert property executes a query in all certificate stores with the given name and selects all of the certificates that match the given criteria. In the example above, the store's name is My (as defined by IceSSL.CertStore). this is equivalent to the store "Personal". If the UWP application manifest has set the "Shared User Certificates" capability the query will look into the current user and application "Personal" stores otherwise it will only match certificates in the application "Personal" store.
UWP applications can use the application certificate store or the system certificate stores. Application stores are isolated from other system stores.
Trusted CA Certificates
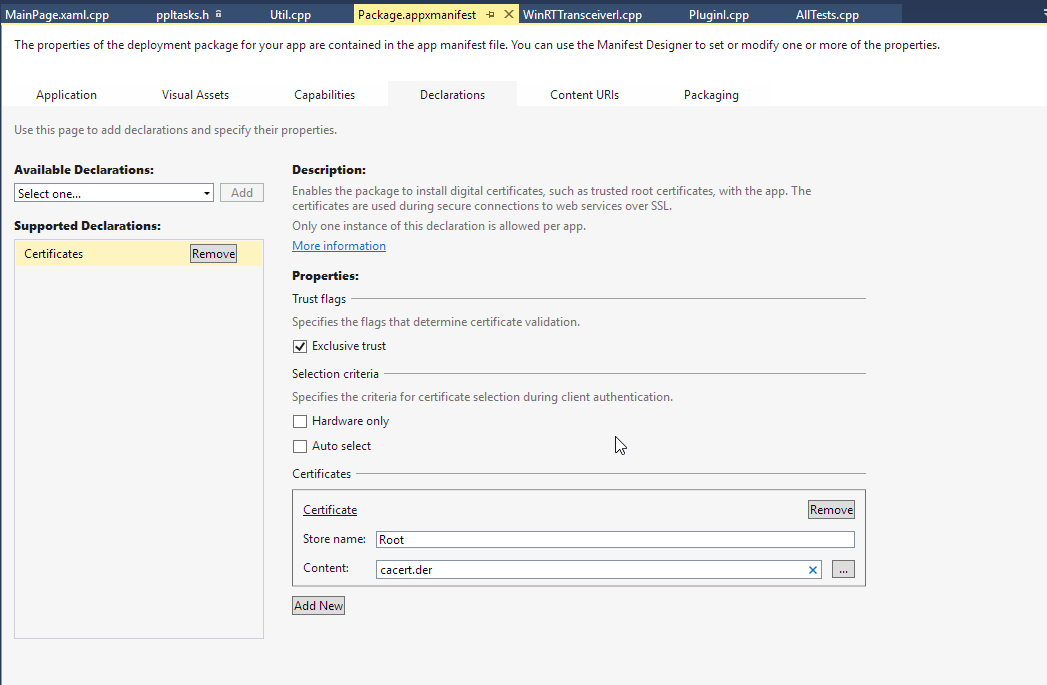
UWP application by default trust certificate authorities from the system and application "Trusted Root Certification Authorities" stores. To limit the trusted authorities to the application "Trusted Root Certification Authorities" store you must use the "Certificates" declaration in the application manifest and set the "Exclusive Trust" flag. The application "Trusted Root Certification Authorities" store is empty by default empty. The "Certificates" declaration in the application manifest allows you to add new certificates. The certificates must be DER encoded.
IceSSL Diagnostics for .NET
You can use two configuration properties to obtain more information about the plug-in's activities. Setting IceSSL.Trace.Security=1 enables the plug-in's diagnostic output, which includes a variety of messages regarding events such as ciphersuite selection, peer verification and trust evaluation. The other property, Ice.Trace.Network, determines how much information is logged about network events such as connections and packets. Note that the output generated by Ice.Trace.Network also includes other transports such as TCP and UDP.
You can enable additional tracing output by creating an XML file such as the one shown below:
<?xml version="1.0" encoding="UTF-8" ?>
<configuration>
    <system.diagnostics>
        <trace autoflush="true"/>
        <sources>
            <source name="System.Net">
                <listeners>
                    <add name="System.Net"/>
                </listeners>
            </source>
            <source name="System.Net.Sockets">
                <listeners>
                    <add name="System.Net"/>
                </listeners>
            </source>
            <source name="System.Net.Cache">
                <listeners>
                    <add name="System.Net"/>
                </listeners>
            </source>
        </sources>
        <sharedListeners>
            <add
            name="System.Net"
            type="System.Diagnostics.TextWriterTraceListener"
            initializeData="trace.txt"
            />
        </sharedListeners>
        <switches>
            <add name="System.Net" value="Verbose"/>
            <add name="System.Net.Sockets" value="Verbose"/>
            <add name="System.Net.Cache" value="Verbose"/>
        </switches>
    </system.diagnostics>
</configuration>
In this example, the output is stored in the file trace.txt. To activate tracing, give the XML file the same name as your executable with a .config extension (such as server.exe.config), and place it in the same directory as the executable.