Application Distribution with Ansible
On this page:
Using Ansible to Distribute Applications
Ansible is a simple and easy to use automation tool which uses SSH for authentication and communication between the control machine and hosts, allowing you to distribute applications to many hosts with very little setup. Tasks to be performed are designed as playbooks – Ansible’s configuration, deployment, and orchestration language. Let's look at how we can use Ansible to securly distribute applications to IceGrid.
IceGrid Configuration
In this example we assume that you have already configured and deployed your servers using IceGrid. Consider the following configuration:
<icegrid>
    <application name="MyDemoApp">
        <node name="Node1">
            <server id="ServerA1" exe="/path/to/application/serverA" ...>
            </server>
            <server id="ServerB1" exe="/path/to/application/serverB" ...>
            </server>
        </node>
        <node name="Node2">
            <server id="ServerA2" exe="/path/to/application/serverA" ...>
            </server>
        </node>
        ...
    </application>
</icegrid>
This deployment contains three servers:
ServerA1: located at/path/to/application/serverANode1ServerA2: located at/path/to/application/serverA,running onNode2ServerB1: located at/path/to/application/serverB, running onNode1
We will also assume you're running one IceGrid registry master instance, and two slave instances.
Ansible Configuration
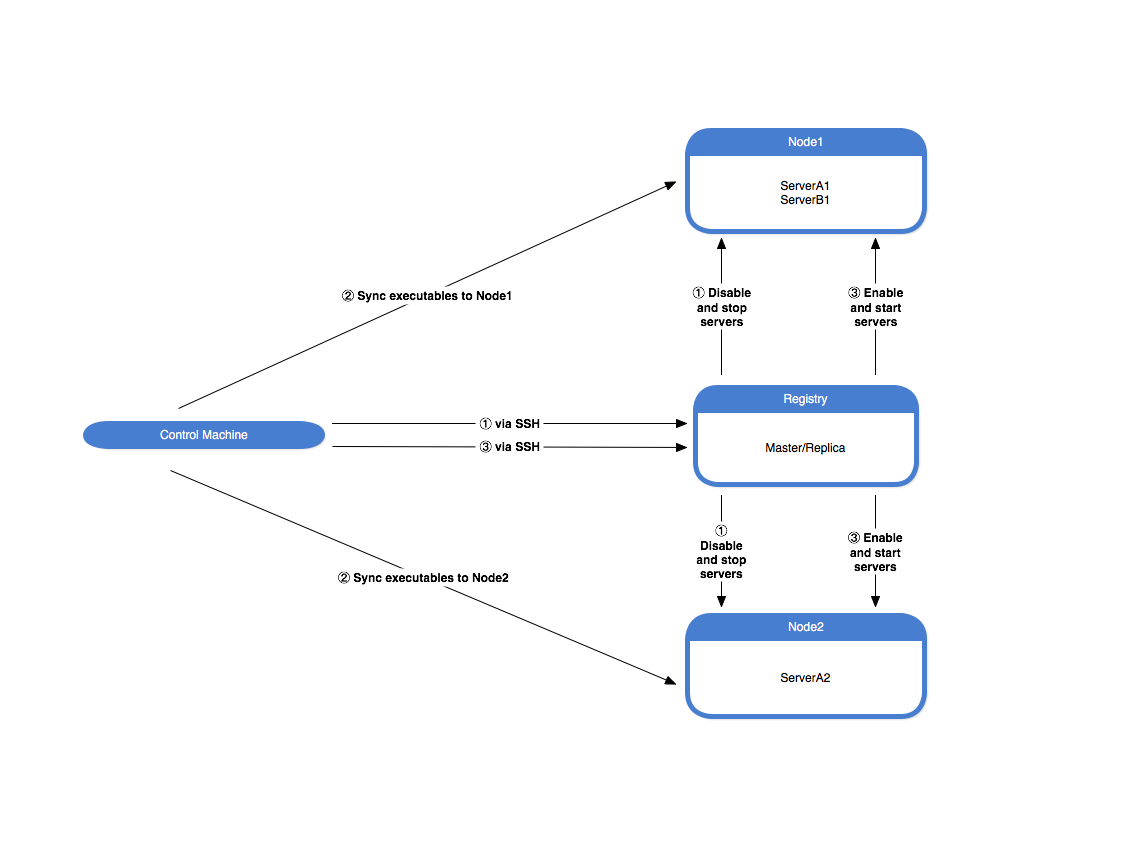
We distribute our server applications in three steps using an Ansible playbook:
- Disable and stop both servers using the IceGrid registry. We want to ensure the servers are disabled so that IceGrid does not automatically restart them.
- Update the server executables on each node.
- Re-enable and start the servers using the IceGrid registry.
To do this we will need a directory with the following layout and files on your local system (where you will run Ansible playbooks).
deploy-server.yml - Ansible playbookinventories/production - Ansible inventory filegroup_vars/production/secure.yml - Encrypted Ansible vaultgroup_vars/production/production.yml - Group variables for productionfiles/serverA - ServerA executablefiles/serverB - ServerB executablelibrary/ - Folder for extra Ansible modules
Before configuring the playbook we first need to look at the other files necessary to make the playbook function.
---
ansible_user: username
servers:
  - ServerA1
  - ServerA2
  - ServerB1
registryHost: localhost
registryPort: 4061
registryUsername: foo
The production.yml file contains all non-secure variables necessary for deploying our application. For example: the username Ansible will use to connect to hosts; the list of server names you need to control; as well as the IceGrid registry's host, port and username. Note that the IceGrid registry password is not included. Secure information should never be stored as plaintext. To store sensitive variables Ansible has a secure storage mechanism called a vault. Vaults are stored on disk encrypted and are only decrypted and loaded into memory while a playbook is running. To create a vault run the following command:
ansible-vault create group_vars/production/secure.yml
After answering all of the prompted questions you can enter data into the newly created vault (your default editor will be automatically opened).
---
regiistryPassword: supersecretpassphrase
Be sure to save the file when you are finished. You can edit it later by running:
ansible-vault edit group_vars/production/secure.yml
Next is the ansible inventory file. This is an INI formatted file which corresponds to groups of hosts on which Ansible will run tasks. Ansible inventory files are used to map these groups to actual IP addresses or DNS entries. A typical deployment will contain at least two inventory files: one for production and one for testing/staging. The following is an example of a production inventory file:
[registry-master]
10.0.0.10

[registry-replicas]
10.0.0.11
10.0.0.12

[server-a]
10.0.0.20
10.0.0.21

[server-b]
10.0.0.20

[registries:children]
registry-master
registry-replicas

[nodes:children]
server1
server2

[production:children]
registries
nodes
Our production inventory contains a master IceGrid registry (registry-master) with two replicas (registry-replicas), as well as hosts that correspond to the servers which run the serverA application (server-a) and the serverB application (server-b). You can also establish host specific settings (such as login username) in this inventory file.
We are now ready to write the playbook. The following playbook distributes a server executable to each IceGrid node using the logic described above.
icegrid_servers module
The icegrid_servers module from ZeroC's ice-ansible repository is required by this playbook. It can be installed by copying icegrid_servers.yml into the library folder.
---
#
# Disable and stop servers, synchronize server executables, and then enable and start servers.
#
- hosts: registries
  tasks:
	- name: Stop and disable servers
	  icegrid_servers:
 		servers: "{{ servers }}"
	    username: "{{ registryUsername }}"
        password: "{{ registryPassword }}"
        enabled: no
        state: stopped
	  run_once: true

- hosts: server-a
  tasks:
    - name: Synchronize serverA application
      synchronize: src=serverA dest=/path/to/application/serverA

- hosts: server-b
  tasks:
    - name: Synchronize serverB application
      synchronize: src=serverB dest=/path/to/application/serverB

- hosts: registries
  tasks:
    - name: Enable and start servers
 	  icegrid_servers:
 		servers: "{{ servers }}"
	    username: "{{ registryUsername }}"
        password: "{{ registryPassword }}"
        enable: yes
        state: started
      run_once: true
The first and last tasks are performed on the first host in the registries (see run_once documentation) group of the inventory, while the second and third tasks are performed on the server-1 and server-2 groups, respectfully.
Running the Playbook
To run the distribute-server.yml playbook on the production inventory, execute the following command:
ansible-playbook -i inventories/production deploy-server.yml --ask-vault-pass
If your master IceGrid registry is unavailable you can filter it out of play by running:
ansible-playbook -i inventories/production deploy-server.yml --ask-vault-pass --limit "!registry-master"
The registry tasks will now run on the next available registry.